
LIFESTAFF AOE BUILD
Whats up everyone! My name is sl3nder and this is my powerfull AOE healing build. This is been my go to build for running endgame dungeons, high level mutations, war and even OPR. This build utilizes a TON of focus and light gear for the high mobility and big, chunky aoe heals. You will be dodging and rolling around all over the place AND this is the build i used to take down Cilla in Lazarus M10 without taking a single orb and 25 stacks the entire fight. Enjoy! Oh and dont forget to check out the video if you dont feel like reading ;)
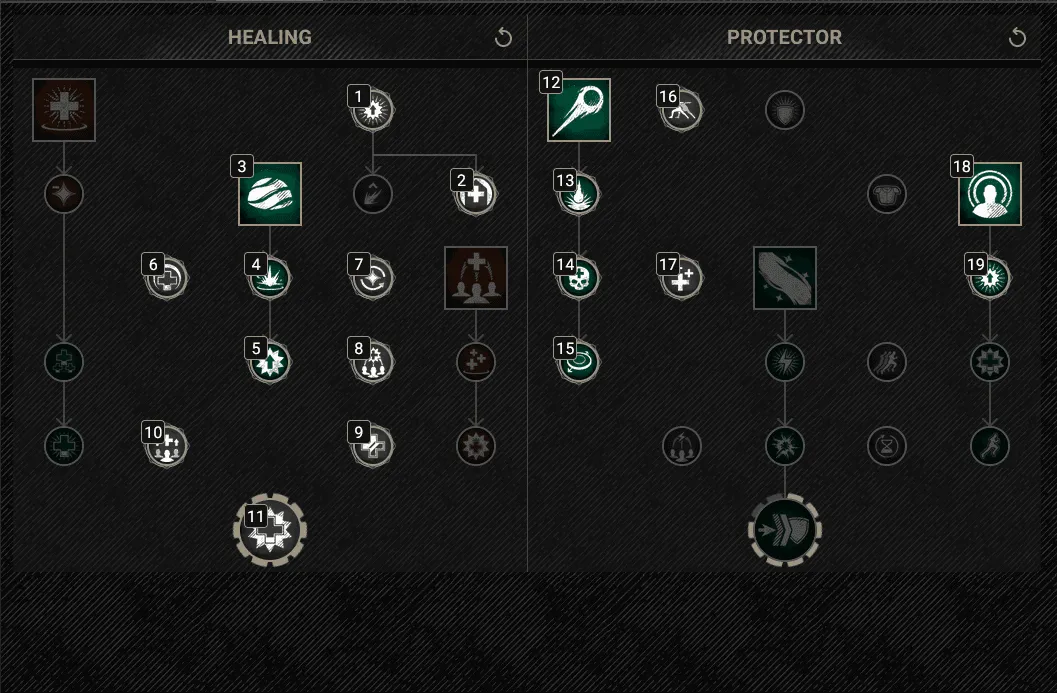
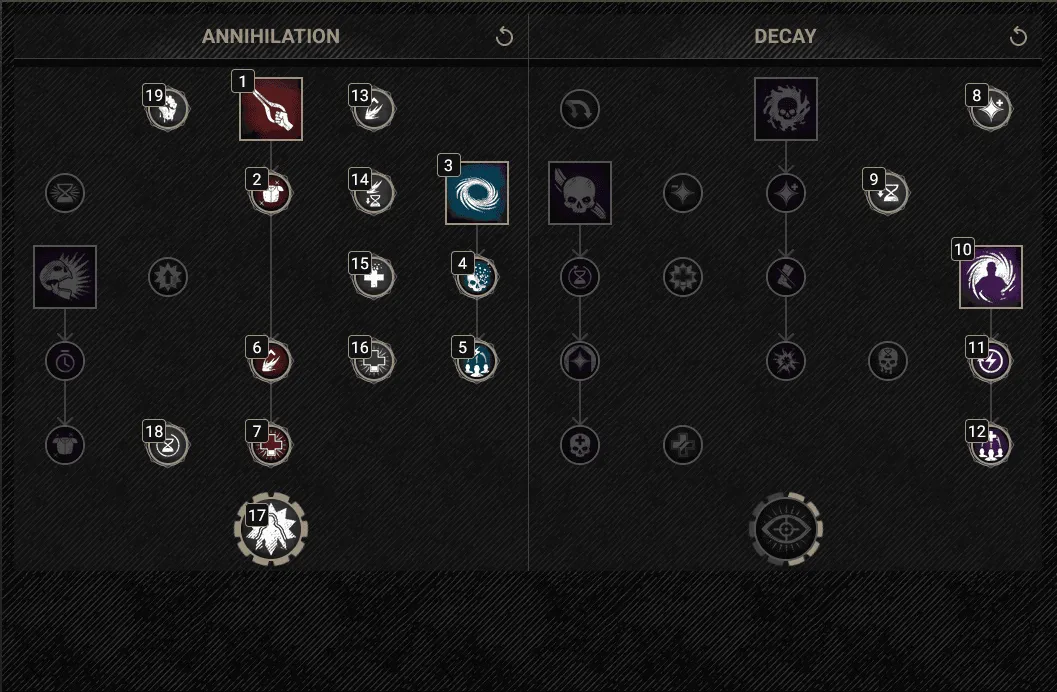
The Skill Trees
We are going to be using Beacon, Orb of Protection and of course, Sacred Ground for the aoe heals. For our offhand, the void gauntlet with Voidblad, Oblivion and Essence Rupture for the damage when needed, healing for the entire group with Essence Rupture and a dmg buff and extra stamina for the group with oblivion.
Lifestaff
Void Gauntlet
About the build
This build is not the easiest to master but once mastered, you will be a powerhouse of healing. This is a very high focus build with very low con so you need to be able to dodge, sense when trouble is coming and be aware of your surroundings. The build is great at group healing but harder when it comes to healing ranged allies that are not in the group.
Another thing to be aware of with THIS build is you will be blamed a lot for the deaths of your teammates if they don't know how to stay in sacred ground when they are low. Whenever you use this build, be sure to let the group know, you are using an AOE build so they MUST get in sacred when low and to use health pots when necessary.
The Good
- Powerful, strong aoe heals
- Amazing group/cluster healing
- Easy when your group knows how to play and GET IN SACRED!
- Better mobility and escape with dodge rolls
- Amazing group buffs with group self healing and empower
The Bad
- Very low HP & Super Squishy
- Must pay close attention to everything!
- Not a lot of room for error
- Can be stressful at times
- No real self heals and hard to heal ranged allies
- Lots of aggro
ATTRIBUTES
OPTION 1 410 Focus - 100 Constitution With ![]() Roasted Rabbit 40 Con Food
Roasted Rabbit 40 Con Food
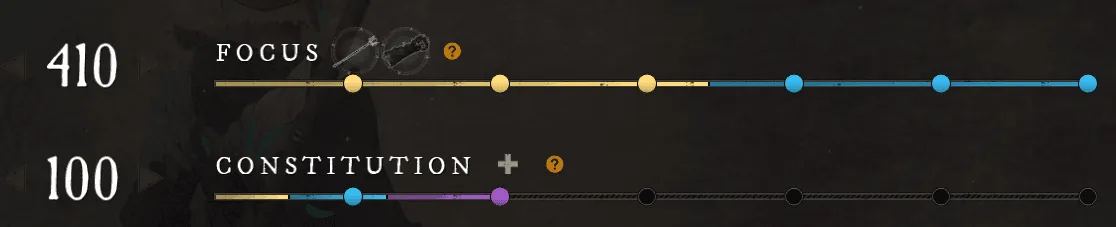
OPTION 2 360 Focus - 150 Constitution With ![]() Roasted Rabbit 40 Con Food
Roasted Rabbit 40 Con Food

Gear
Life Staffs
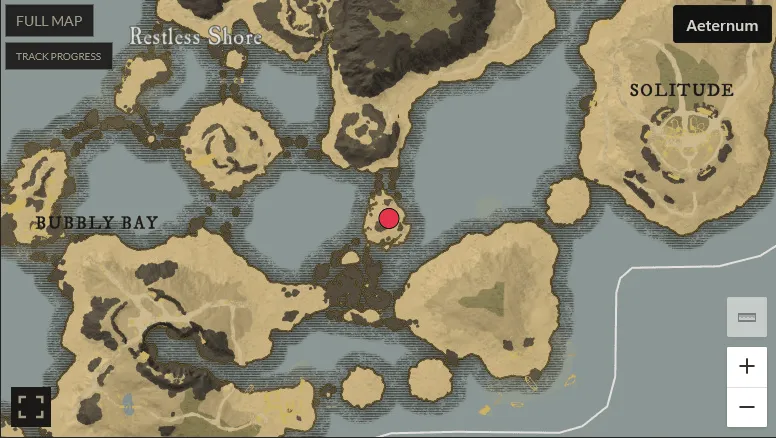
Good starter life staff that drops from Harekeeper, the ghost that spawns when you kill Stanley the Rabbit in Restless Shores. This is easily farmed and the drop chance is pretty good. This will take you all the way up to the faction lifestaff.
Location
![]() 2. Syndicate Alchemist Life Staff
2. Syndicate Alchemist Life Staff
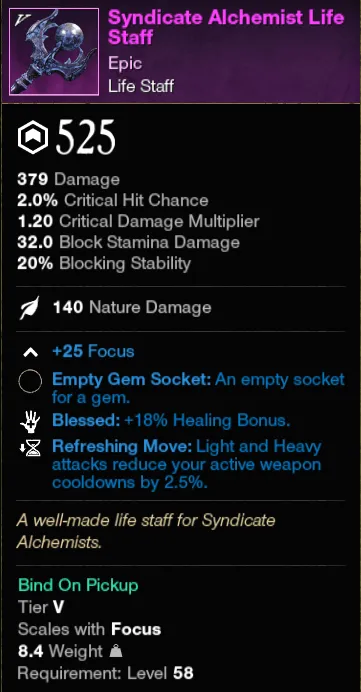
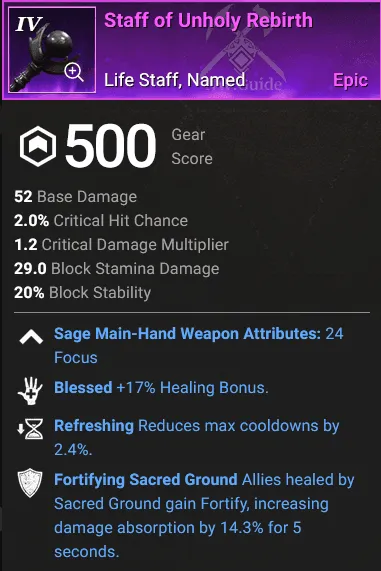
This is one of the 3 different faction lifestaffs, this is a great option as you work toward Will of the ancients from Lazarus or a BIS lifestaff. You get this at your faction vendor.
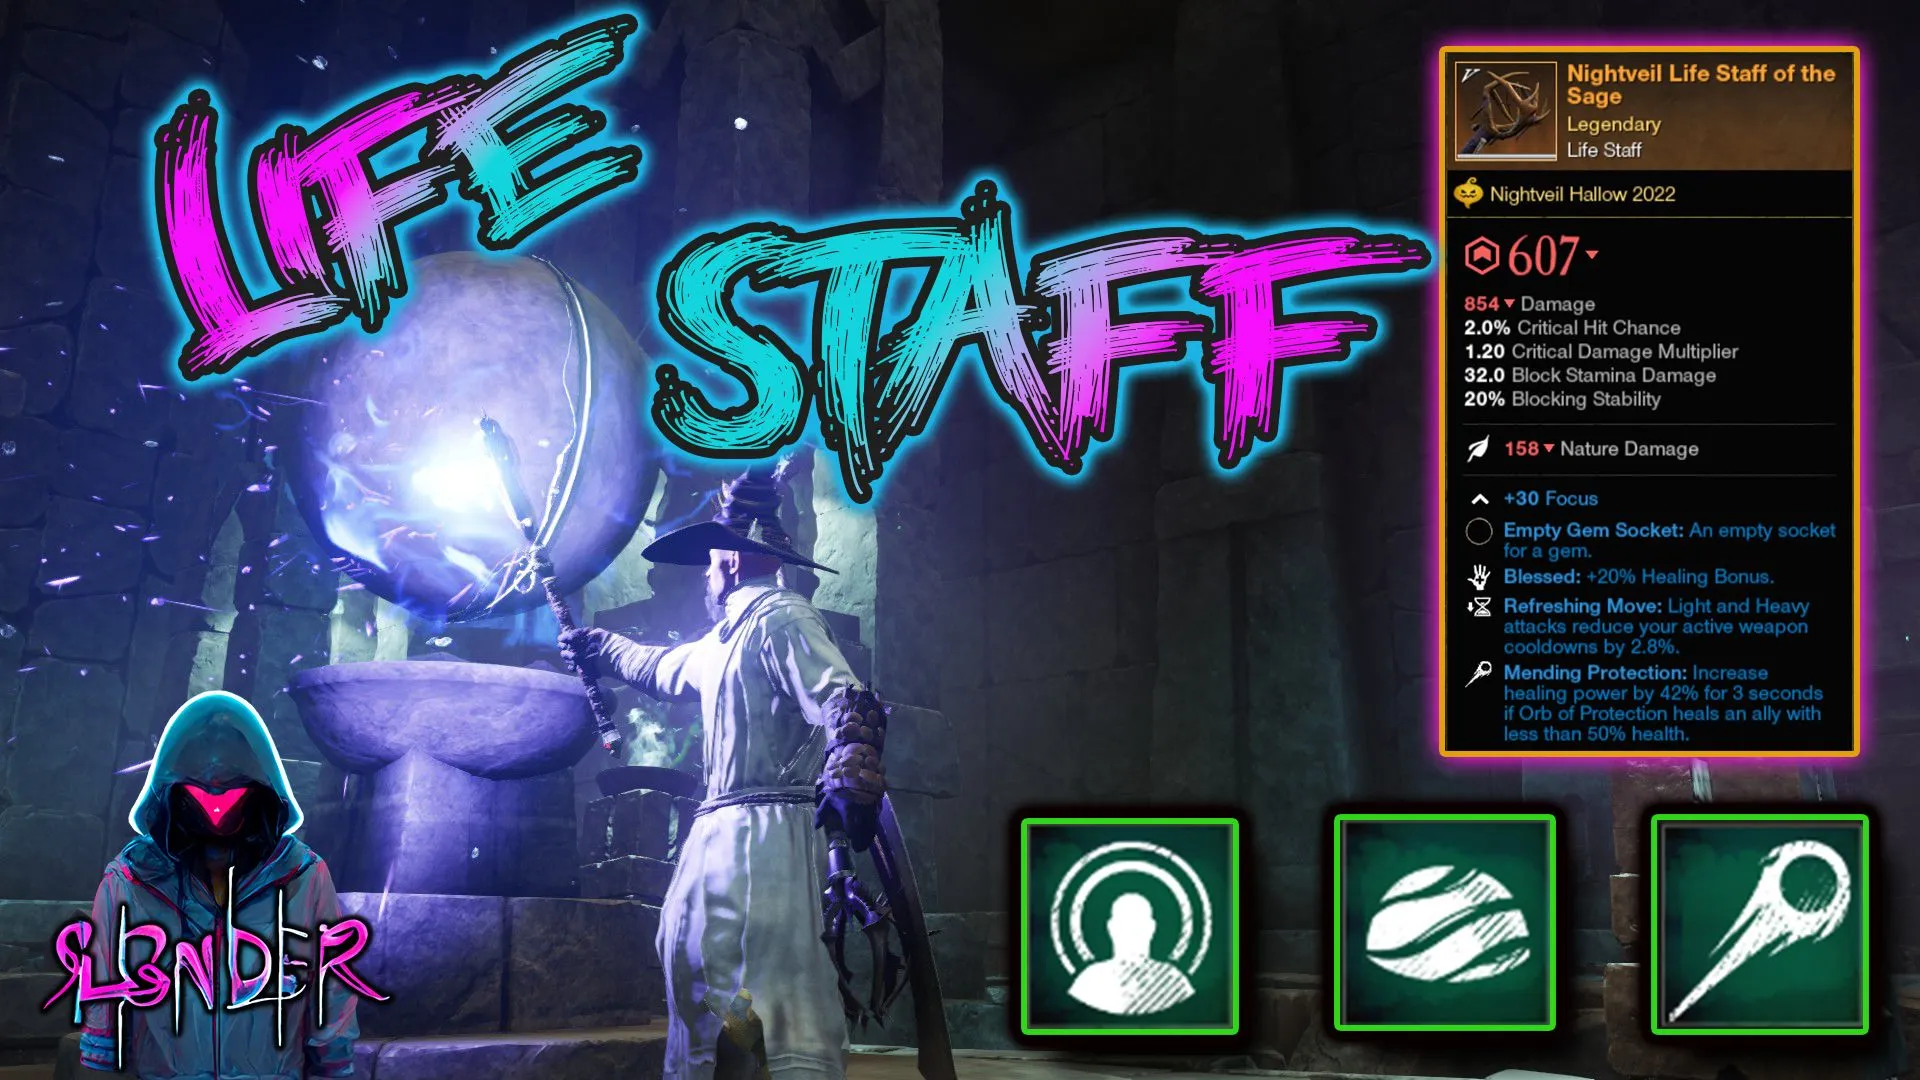
This WAS the BIS lifestaff from the Lazarus Instrumentality expedition that drops from several different mobs or can be crafted with ![]() Materia This will be the lifestaff you want to upgrade to 625, the only other lifestaffs that can beat this one would be a best in slot lifestaff with the 2 most important perks
Materia This will be the lifestaff you want to upgrade to 625, the only other lifestaffs that can beat this one would be a best in slot lifestaff with the 2 most important perks ![]() and
and ![]() Blessed and either ability perk
Blessed and either ability perk ![]() Fortifying Sacred Ground or
Fortifying Sacred Ground or ![]() Mending Protection.
Mending Protection.
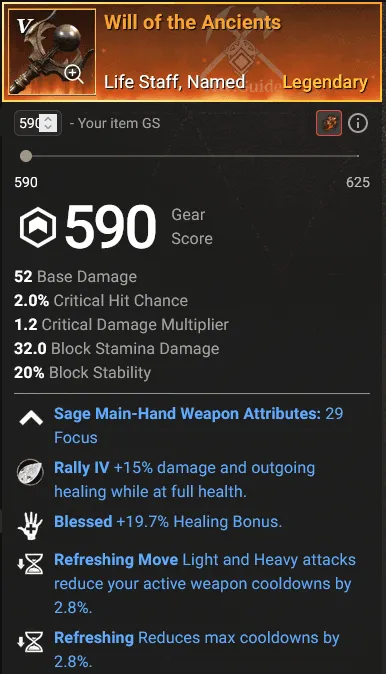
3. BIS Lifestaff Example

This is an example of a BIS lifestaff that i crafted. This is MY favorite lifestaff ability perk ![]() Mending Protection.
Mending Protection.
Lifestaff Perks (In Order of Priority)
 Blessed The most important
  Refreshing Move Another Must have, this will give you SO MUCH cool down reduction.
 Mending Protection OR
  Fortifying Sacred Ground both of these are more must haves on your lifestaff, if you have one on your lifestaff, make sure you have the other on your armor.
  Refreshing Or
  Refreshing Evasion as you can see, cooldown reduction is HUGE for this build. These are more very solid perks to have on your weapon.
Offhand Weapon Choices
1. Void Gauntlet - Very solid choice due to the utility, group self healing with Essence Rupture and group wide empower / stamina regen with Oblivion. This is USUALLY my go to weapon. You can also pump out some decent dmg with voidblade and get another group heal with VoidCaller.

2. Great Axe - This is another one of my favorites, people sometimes ask questions when they see this but the gravity well, especially if your group doesn't have one, is invaluable. I think for mutations, this is the best crowd control ability in the game. It also has great escape with charge.

Armor
For armor, you are going to want a light loadout for maximum healing power as it gives a bonus to your healing and dmg as well as the dodgeroll. You are more mobile, you can cover more ground with your dodge and once you try it or get used to it, you will never go back. You can use the following combinations or armor weights.
Loadout
Option 1 Option 2
| Armor Piece | Weight | Armor Piece | Weight |
| Head | Light | Head | Medium |
| Chest | Medium | Chest | Light |
| Gloves | Light | Gloves | Light |
| Legs | Light | Legs | Light |
| Boots | Light | Boots | Medium |
Perks
Perks are very important and can really make this build shine. The number one perk you want as a healer is going to be refreshing evasion or refreshing. Cooldown reduction is KING for a healer in general. I like refreshing evasion better but refreshing will definitely work as well. Just stay away from refreshing ward as you will rely on getting hit for your CDR and we really aren't trying to get hit a lot lol. Another VERY strong perk is corrupted ward, ancient ward, etc... If you are running a dungeon with corrupted, you want corrupted ward, so on and so forth.
In Order For Priority (PVE)
- Refreshing Evasion / Refreshing
- Ward -
 Corrupted Ward,
  Ancient Ward - for whatever dungeon you are running.
  Freedom - Helps with cc, when you are stunned, slowed, you are dead. If you are dead, the group is dead... usually.
 Shirking Fortification /
  Shirking Energy - extra fort and stamina is always good.
  Physical Aversion - as a healer, we get hit A LOT by ranged enemies, bows, etc... And they hurt. This provides protection from physical ranged attacks. Another solid choice.
In Order For Priority (PVP)
Jewelry
Amulet
Perks (In Order of Priority)
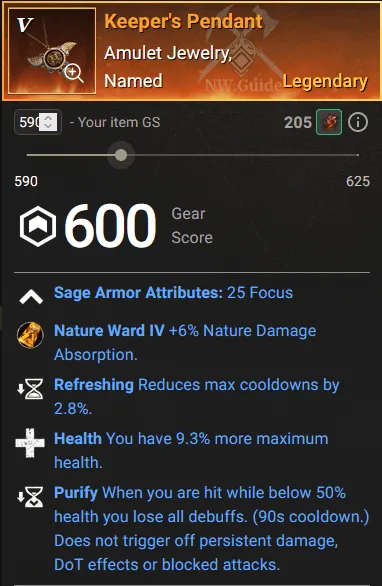
You can get a decent amulet from Dynasty called ![]() Keeper's Pendant or
Keeper's Pendant or ![]() Tempest's Heart from Tempest.
Tempest's Heart from Tempest.
RING
Perks (In Order of Priority)
You can get a decent ring called ![]() Silver Leaf to get you started while you work towards your BIS ring.
Silver Leaf to get you started while you work towards your BIS ring.
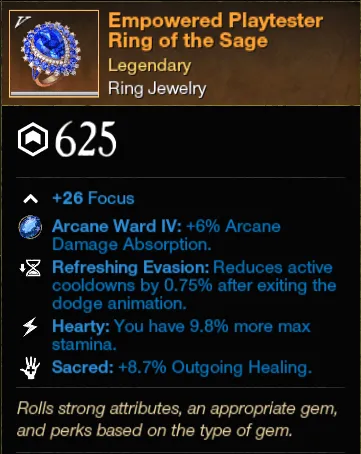
Example of a BIS Ring
EARRING
Perks (In Order of Priority)
You can get a nice earring called ![]() Scarab Shell from Brimstone or
Scarab Shell from Brimstone or ![]() Teardrop from Barnacles and BlackPowder.
Teardrop from Barnacles and BlackPowder.
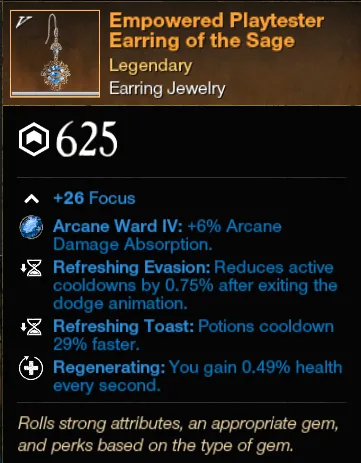
Example of a BIS earring
HEARTRUNES
1. ![]() Stalwart Heartrune of Dark Ascent
Stalwart Heartrune of Dark Ascent
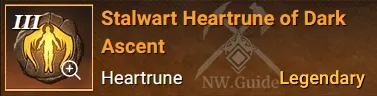
This is my first choice. Dark Ascent is an AMAZING choice and is my go to. This can be used as a self heal since we really lack that ability and can get you out of ALL KINDS of dangerous situations. If you have mobs on you because of your crazy healer aggro, you pop this, jump in the air, slam down and stagger all the enemies attacking you which allows you to escape, you also heal for 100% of the damage AND you gain fortify. Simply amazing.
2. ![]() Stalwart Heartrune of StoneForm
Stalwart Heartrune of StoneForm
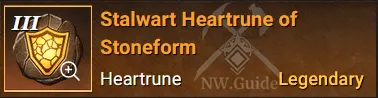
This is also a great choice. You cleanse ALL crowd control debuffs and are immune to stagger and cc for 5 sec, you gain fortify and heal yourself.
GEMS
WEAPONS

I use this for both of my weapons because it gives you +15% outgoing HEALING and damage. I use it on my lifestaff for obvious reasons and use it on my void gauntlet for the extra damage. The reason i don't use the runeglass version of the gem is because it brings the healing bonus down to +12%. I'd rather have the extra 3% healing than a little bit of stamina.
2. ![]() Runeglass of Energizing Amber
Runeglass of Energizing Amber

This is a really solid choice for your offhand as it converts some of the dmg to nature and scales off your high focus AND gives you a little bit of stamina on successful hits.
ARMOR
![]() Runeglass of Energizing Diamond
Runeglass of Energizing Diamond

These are my go to since the diamond gives you both physical and elemental dmg mitigation and the reason i choose energizing is for the extra stamina on hit.
FOOD
1. ![]() Roasted Rabbit With Seasoned Vegetables +40 Constitution
Roasted Rabbit With Seasoned Vegetables +40 Constitution
2. ![]() Blackened Lava Barb With Corn Succotash +40 Focus
Blackened Lava Barb With Corn Succotash +40 Focus
HOW TO PLAY
The Rotation
What you want to do is practice maintaining your 3 stacks of Intensify. This gives you +30% bonus healing at max stacks (3 stacks). You do this by heavy attacking the boss (bigger, easier target) or mobs. Right before it expires just throw in another heavy to refresh the 3 stacks. After you have the 3 stacks of intensify, you want to dodge which gives you another +20% bonus healing from Bend Light. Once you have both of these buffs, you want to hit the group with Orb of Protection because you SHOULD have Mending Protection on your lifestaff which gives you ANOTHER +42% bonus healing for 3 sec IF you heal an ally below 50% hp with it. This will give you a CRAZY strong sacred ground and beacon, its absolutely nutty and just feels so so good.
This will take a while to get down but once you do and it becomes second nature, you will be a monster healing machine and once people get in your sacred grounds, they will never want to be in anyone else's. ever....
Tips
1. Healing Yourself or Ranged Allies
The only hard part of this build is self healing and healing an ally that's outside or ranged that's away from the "PILE" or group. You can do this by hitting them or yourself with a quick orb of protection as it's got a really quick cooldown. You will need to save your HP Pots for emergencies only and you also have dark ascent in your back pocket should you need it. Also, get used to running into the fight to get in your own sacred ground, hold block and pray. DO NOT WASTE a sacred ground on yourself or 1 ally that gets caught out.
2. Learn to dodge EVERYTHING!
This build is not a lazy build at all, the light gear and high focus/low con is tough to pull off at first but once you do, its absolutely amazing. Learn to dodge and people from all over will come see you, just to be in your crazy strong sacred grounds.
3. Dont heal too early
Make sure to wait for the tank to get aggro before you start tossing heals around. I used to preemptively put a sacred down or top off an ally before the fight starts. Dont do that lol. Wait until the tank has aggro and has taunted. Learn what the taunts look like and sound like.
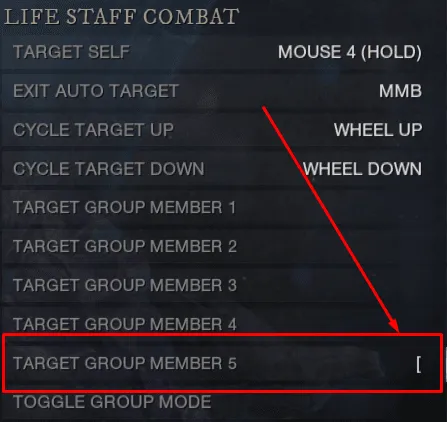
4. Use the new Group Hotkey Buttons
I like to set one of these to my mouse button and set it to the group member number for the tank. If your tank is on top of the party frames, set it to group member 1. This way you can quickly, without thinking, toss a sacred right on the tank without missing. You know how sometimes you place a sacred on yourself on accident or in some random spot, not on the tank? This helps so much. You just press the hotkey you set, then press the sacred ground button and bam, tank has a fresh sacred without even looking at the screen.
5. Set your "target self" button to something easy.
If "Left CTRL" works for you, great! I use my side mouse button. If im standing in the group of allies with the tank and we need heals, i just hold my side mouse button and hit sacred. Its fast and easy.
6. You can swap out Beacon for something else.
Some fights are crazier than others and theres just no way for everyone to stay grouped up or stacked. If theres a hard fight coming up where you wont be able to really utilize the aoe healing, get rid of beacon and use splash of light or divine embrace. These are great heals and they have their place. Dont be afraid to switch it up. Sometimes its mandatory!
I hope this all helps! If you have any questions, feel free to visit my discord or come stop by my stream on twitch sometime. Bye guys!
sl3nder's discord - https://discord.gg/Dt9WtX6QQu
sl3nder's twitch - twitch.tv/sl3nderttv
sl3nder's youtube - youtube.com/sl3ndermmo